
in goldengate 12c, oracle introduced universal installed(OUI) for installation, which makes it simpler.The installation need to be done on both source and target hosts, where gg process will be running.
Lets see the steps.
1. Download the goldengate software for the appropriate os platform.
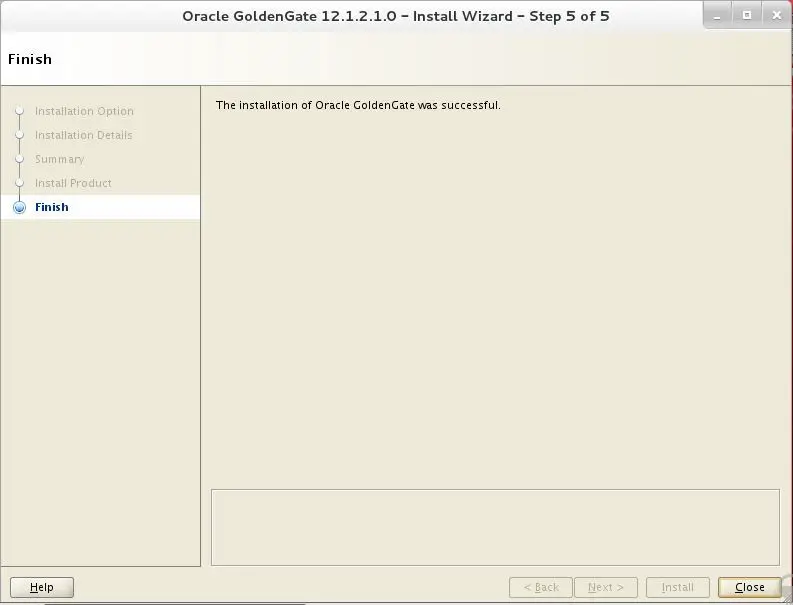
2. unzip the V46695-01.zip and execute runInstaller[both SOURCE & TARGET ]
[oracle@localhost sf_stuff]$ unzip V46695-01.zip
[oracle@localhost sf_stuff]$ cd fbo_ggs_Linux_x64_shiphome
[oracle@localhost fbo_ggs_Linux_x64_shiphome]$ ls -ltr
total 0
drwxr-xr-x. 5 oracle oracle 66 Aug 7 2014 Disk1
[oracle@localhost fbo_ggs_Linux_x64_shiphome]$ cd *
[oracle@localhost Disk1]$ pwd
/media/sf_stuff/fbo_ggs_Linux_x64_shiphome/Disk1
[oracle@localhost Disk1]$ ls -ltr
total 12
drwxr-xr-x. 4 oracle oracle 4096 Aug 7 2014 install
drwxr-xr-x. 11 oracle oracle 4096 Aug 7 2014 stage
-rwxr-xr-x. 1 oracle oracle 918 Aug 7 2014 runInstaller
drwxrwxr-x. 2 oracle oracle 24 Aug 7 2014 response

[oracle@localhost Disk1]$ ./runInstaller
Starting Oracle Universal Installer...

Checking Temp space: must be greater than 120 MB. Actual 19865 MB Passed
Checking swap space: must be greater than 150 MB. Actual 2063 MB Passed
Checking monitor: must be configured to display at least 256 colors. Actual 16777216 Passed
Preparing to launch Oracle Universal Installer from /tmp/OraInstall2015-08-12_11-56-59AM. Please wait ...[oracle@localhost Disk1]$
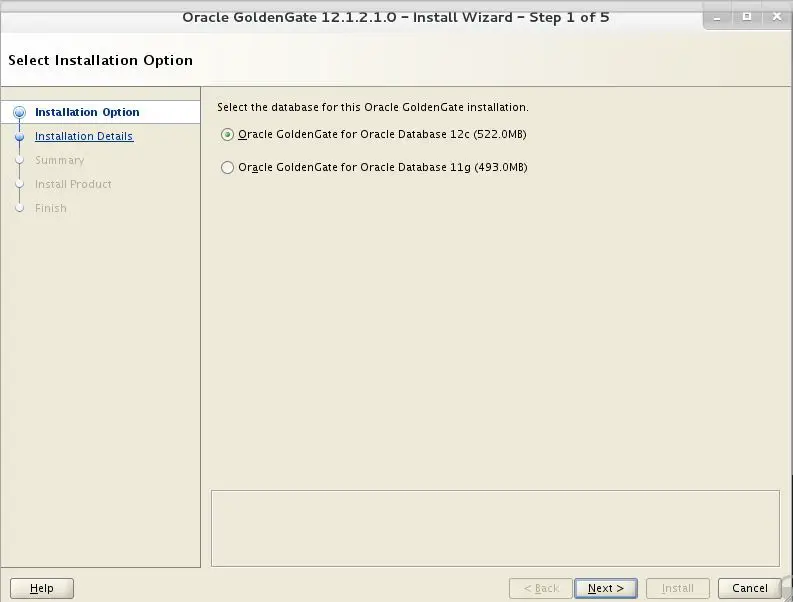
You can select whether your database is 11g or 12c.
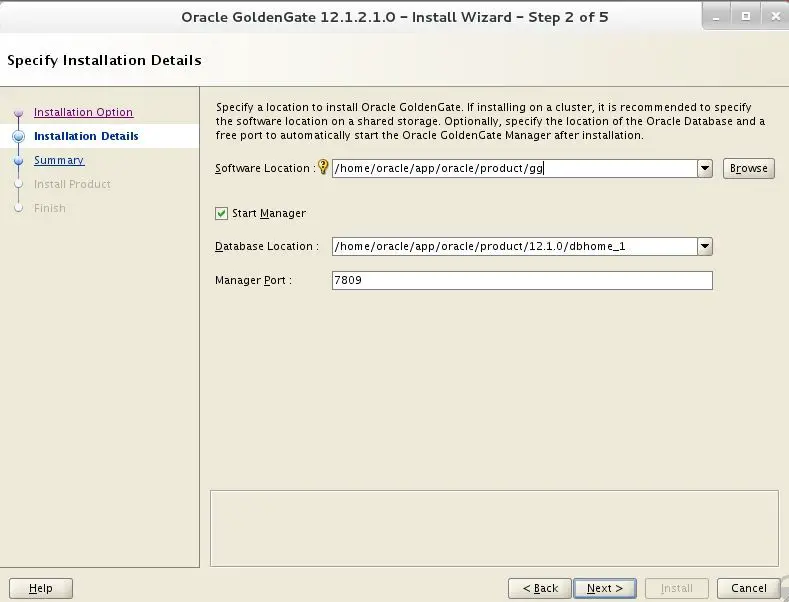
Software Location – This will be the goldengate Home location
Database Location – This is your database Home location
Manager – If you select start manager and the specify the port, then once installation is done, manager process will be started automatically.
[oracle@localhost gg]$ ./ggsci
./ggsci: error while loading shared libraries: libnnz12.so: cannot open shared object file: No such file or directory
[oracle@localhost gg]$ export LD_LIBRARY_PATH=$ORACLE_HOME/lib
[oracle@localhost gg]$ ./ggsci

Oracle GoldenGate Command Interpreter for Oracle
Version 12.1.2.1.0 OGGCORE_12.1.2.1.0_PLATFORMS_140727.2135.1_FBO
Linux, x64, 64bit (optimized), Oracle 12c on Aug 7 2014 10:21:34
Operating system character set identified as UTF-8.

Copyright (C) 1995, 2014, Oracle and/or its affiliates. All rights reserved.

GGSCI (localhost.localdomain) 1> info all

Program Status Group Lag at Chkpt Time Since Chkpt

MANAGER RUNNING
3.Create tablespace on both Source and Target Databases
SQL> create tablespace ggate_TBS datafile '/u02/oradata/EODD4/ggate.dbf' size 5g autoextend on next 500m maxsize 10g extent management local segment space management auto;
4. Create database user for goldengate on extract side [ SOURCE DB]
Create a database user that is dedicated to Oracle GoldenGate Manager, Extract, Replicat processes. It can be the same user for all of the Oracle GoldenGate processes that must connect to a database. In our case the user is “GGATE_USER”
SQL> create user ggate_user identified by ggate_user  default tablespace ggate_TBS;

----Assign the correct privileges to the Oracle GoldenGate database user as shown below
grant create session, alter session to ggate_user;
grant connect,resource to ggate_user;
grant select any dictionary to ggate_user;
grant flashback any table to ggate_user;
grant select any table to ggate_user;
grant create table to ggate_user;
grant execute on dbms_flashback to ggate_user;
grant select any TRANSACTION to ggate_user;
grant LOCK ANY TABLE to ggate_user;
grant execute on utl_file to ggate_user;
5.Create database user for goldengate on replicat side [ TARGET DB]
SQL> create user ggate_user identified by ggate_user  default tablespace ggate_TBS;

SQL> GRANT DBA TO GGATE_USER;
6. Enable archivelog mode for the database:[SOURCE DB]
Make sure the database is in archive log mode: – How to enable archive mode
7.Enable supplemental logging at database level:[SOURCE DB]
Usually, insert and delete statement involves complete row change. But update can be done on a particular set of columns. So Redo logs don’t capture sufficient information for update statements, i.e Oracle logs only changed columns for update operation in the redo. Without sufficient info , goldengate can’t find which row to be updated. So supplemental logging enables in capturing additional information for update operations in redo logs.
Below command will enable a minimum level of supplemental logging at the database level.
SQL> ALTER DATABASE ADD SUPPLEMENTAL LOG DATA (ALL) COLUMNS;
Database altered
8.Enable force_logging for the database:[ SOURCE]
alter database force logging;

select force_logging from v$database;
9.Check the gg login[SOURCE & TARGET]
GGSCI >  dblogin userid ggate_user, password ggate_user
Successfully logged into database.
10.Create checkpoint table on REPLICAT side[ TARGET]
ggsci> add checkpointtable ggate_user.testcheckpoint
11.Update ./GLOBALS file on REPLICATE side [ TARGET]
 cat ./GLOBALS
GGSCHEMA ggate_user
checkpointtable ggate_user.testcheckpoint
ALLOWOUTPUTDIR /ggate/oradata/datacapture/TRG
Where ALLOWOUTPUTDIR is the path in the replicate side, where trail files will be copied.
With this installation of goldengate with required basic configuration has been completed.
Hi,
GREAT INFO. YOU ARE DOING A WONDERFUL JOB. KEEP IT UP.
SMALL CLARIFICATION IS NEEDED.
WHAT DO YOU MEAN BY “i.e Oracle logs only changed columns for update operation in the redo”.
WHY IS THAT INFO NOT SUFFICIENT.